 |
 |
The first thing I need to mention about DSL is it usually associated with some kind of network. This was not the case in the early days of DSL, but things have changed since then. Instead of each computer having a modem, you have a single modem that feeds into a network that all your computers are on. This has several advantages. First, only one modem is needed for all the computers, and second, all computers can connect to the internet at the same time through the single modem.
There are three types of networks in use for DSL. The first is ethernet. Many DSL modems have an ethernet connection rather than the usual RS-232 connection. If you only have one computer, you connect the DSL modem directly to the computer's ethernet card using a crossover ethernet cable. If your computer does not have an ethernet card, you can buy one for $20.
If you have more than one computer and each one has an ethernet card, you can connect each computer, plus the DSL modem to a network hub with a straight-through ethernet cable. That allows all the computers on the network to access the internet through the DSL modem.
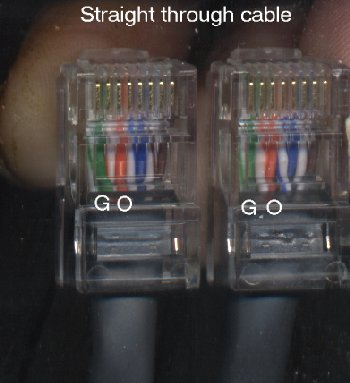
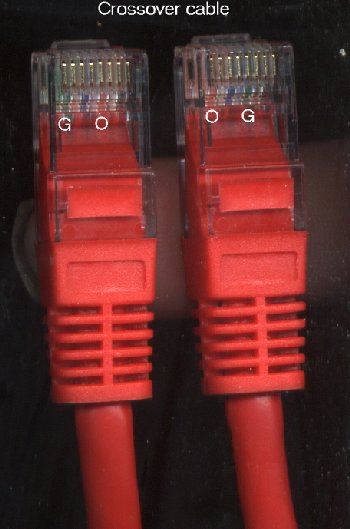
The next thing I need to mention is how to tell the difference in straight-through and crossover ethernet cables. You can tell the difference by visual inspection of the ends of the cable.
|
|
Ethernet is a pretty fool-proof networking system if you use the right cables where needed, crossover for a modem connected to a single computer or straight-through to a network hub. If it would be a big hassle to run ethernet cable between computers, there are two other network options. One called HPNA (home phone-line network adaptor) involves using telephone wires for the network, and there's also a wireless system.
I personally do not like these other two network systems because I feel that they make a complicated DSL installation that much more complicated. They involve opening up computers and installing home phone-line adaptor (HPNA) cards, which is not necessary if your computer comes with ethernet built-in (more and more computers come with ethernet as standard equipment). If you would like to learn more about these other network systems, you should visit the 2wire web site. The device to read up on is called the Home Portal.
The part of the DSL installation that is really tricky is the proper installation of the microfilters. If you do not connect these to every device that plugs into the phone line (except the DSL modem), the DSL signal will not be usable. My DSL installation didn't work at first because I hadn't installed a microfilter on one phone. That one mistake kept it from working.
This explains why I don't like networks that use telephone wiring. It further complicates which lines get micrpfilters and which lines don't. Without this type of network, the rule is simple. Everything that plugs into the phone line besides the DSL modem gets a microfilter. In other words, if it isn't the DSL modem, it gets a microfilter.
I like external modems better than internal ones. First, they are easier to connect to a network, and second, they have status lights which helps with the troubleshooting. Here's what my DSL modem looks like when everything is functioning properly.
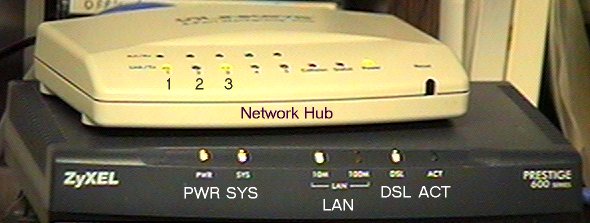
In the above picture, the DSL modem feeds into a network hub. Two computers are connected to the network. Computer number two happens to be off at the moment, which is why its light is out. Item three is the DSL modem. The black box below the network hub is the DSL modem. I'm not sure what function the SYS light and the ACT light have, but here's what the rest indicate. The PWR light is obvious. It indicates that the modem is turned on and is getting power. The LAN 10 M and 100 M lights indicate the speed of the ethernet card (or the network hub, as is the case in the picture above) that the modem is connected to. One or the other should be on. The DSL light must come on and stay on before DSL will work. It used to take as long as 30 minutes for this to happen on my system. I got much better results when I moved the DSL modem to a phone jack closer to where the telephone service entered the building. If this light never comes on, chances are you're connected to a line that doesn't have DSL installed yet. On the other hand, if it keeps blinking on and off, look for a phone or other device connected to the phone line that doesn't have a microfilter connected to it and install a microfilter. Once you get everything right, the DSL light should come on and stay on.
I think the best way to start is to unplug everything from the phone line except for the DSL modem. Once the DSL light comes on and stays on, plug each item back into the phone line one at a time and check to make sure the DSL light is still on after connecting each device.
Once you get DSL up and running, here's a page where you can check your DSL speed. After clicking on the link, click the button that says check bandwidth.
![]()
Copyright © 2002, Colin Pringle
(colinp1@mindspring.com)
filename: dsl.htm